A month or so ago I was pontificating on the tediousness of uploading images one by one to your WordPress weblog. I was wishing that there was some sort of solution to eliminate some of those tedious steps. Normally the process goes like this; step one: take some screenshots of your computer… step two: save each of these screen shots onto your desktop… step three: login to your WordPress blog (this should actually work with any other blogging systems such as blogger, movable type, live Journal,… however it will not work with my space.com because Rupert Murdoch is an evildoer) and click on the “browse ” button to browse for images…. step four: click on the “insert into blog” button… process complete.
Today while doing some additional web camera a research I ran across some handy new software that should save a step or two. Here is what my new process of inserting an image looks like. Step one: save the screenshot to my desktop… step two: switch to “code” view and type out the image tag and URL…. process complete.
I guess that is two steps instead of four. I guess that’s not guess I guess that is a fact. I know what you’re thinking… you’re thinking something like “doesn’t this guy have anything better to do with his life besides save a couple steps on uploading images to his personal weblog” and the answer is yes. Yes I do have something better to do but if I was always doing those better things to do they wouldn’t seem so much better would they?
 oh I’m sorry; was I babbling?
here is what you’ll need to save your steps: FTP access to your weblog or some other FTP server where you feel comfortable uploading your images. This FTP program: http://www.nchsoftware.com/ftp/index.htmlÂ
this is not just another FTP program; it is special. It is special because it sits there and does its job by not eating up too much computer resources and saving you valuable time. It is also free.
Once you have your FTP info and the program downloaded and installed here is how I recommend you proceed. Step one: create a folder on your desktop called “blog_images”. This is a folder where you are going to save all of your images and screenshots that you want to use on your weblog. Your new FTP program “fling” is going to monitor this folder and love every minute of its indentured servitude. Whenever it spots a new picture in the folder it will automatically and immediately be uploaded to a folder of your choice on your weblog. Of course this will also work with any other file you place in this folder. Including subfolders I believe.
Time-saving tip: systemize how you name your images. If you know the exact filename of your images you will not need to be visually browse them before embedding them.
So here is how I have my setup setup: C:\Documents and Settings\Administrator.VAIO\Desktop\1st-uploads\wes_edholm\ is where I am saving my images to.
http://www.wesedholm.com/wp-content/uploads/ is the folder on my web host where fling is automatically uploading images to.
So if I want to insert the screenshots that I took of the FTP program today I have two choices; I can click on the insert image button using the WYSIWYG functionality or I can just write out the HTML tag for the images.
that’s it. Now if you will excuse me got better things to do.
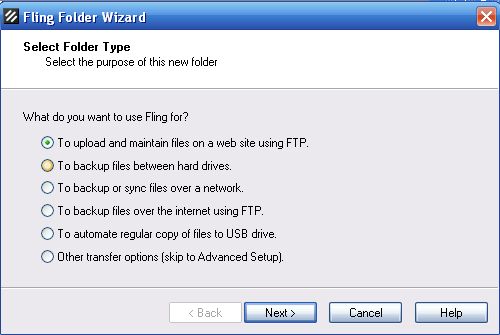
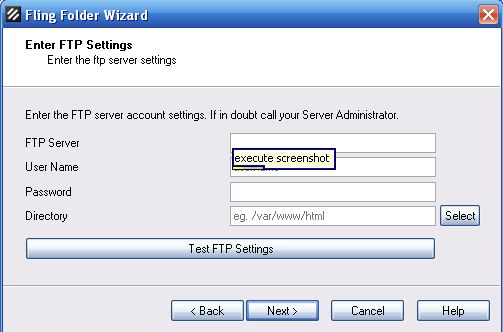
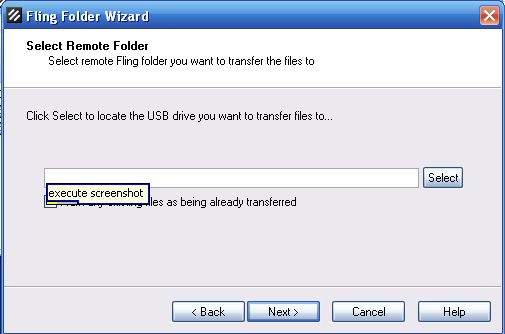
PS: here are the screenshots:


Tag: easier way to save images to your weblog, automatic image upload, hassle uploading images to your weblog, Word press, live Journal, movable type, blogger,.